Note: The creative photography ideas listed in this article should not be explored haphazardly within a Photography course, but rather selected purposefully, if appropriate for your topic or theme. These approaches may or may not be relevant for your own photography project and should be chosen only in conjunction with advice from your teacher. The techniques listed here are created using a range of different cameras and devices, such as a digital SLR/DSLR camera, traditional camera, pinhole camera and/or camera phone.
Stain, smudge and erode photographs using water, like Matthew Brandt:
Matthew Brandt has created unexpected and dramatic running of coloured ink by submerging printed photographs in water. After photographing lakes or reservoirs from around the United States, Brandt collects samples of water and brings them back to his studio. He then soaks the c-prints in water from the location that the image represents. Over time, the surface begins to degrade, creating images that are relics of this process. This is a great example of how creative photography techniques can (and should) be driven by the subject or theme that is explored.
Print photographs onto a flexible surface and stretch or distort them, as in these works by Michal Macku:
Michal Macku has invented his own technique, which he named ‘Gellage’, whereby photographic emulsion is removed from its paper backing, leaving an image that is semi-transparent and flexible. This allows the image to be stretched and reformed – sometimes combined with other images to make imaginative, distorted and/or surreal scenes – before the artwork is adhered to durable paper.
Burn photographs, as in these examples by Lucas Simões:
High school Photography students are able to experiment with burning or scratching negatives prior to printing or once the photo is printed. In these dramatic photographs, Lucas Simões purposefully targets the faces, leaving a single eye. As when using any dangerous technique, burning should be attempted with adult/teacher supervision and care.
Sew or embroider photos, as in the stitched vintage photography of Maurizio Anzeri:
Maurizio Anzeri offers a wealth of inspiration for students who are looking for portrait photography ideas. The brightly embroidered patterns and delicately stitched veils cross the faces with sharp lines and dramatic glimmering forms. Note: Although Anzeri sews directly into found vintage photographs (often from flea markets and car boot sales) it is usually recommended that most high school students use their own photographs for this purpose.
Lisa Kokin takes found, unrelated photographs and stitches them together, fabricating a relationship between them; creating an imagined life from the nostalgic shots.
Wrap torn plastic or other materials around the edge of your camera to create hazy edges, as in the photographs of Jesse David McGrady (via PetaPixel):
This clever photography trick produces soft, hazy edges around with a photograph, helping to create a seductive, ethereal or other-worldly atmosphere. Jessy David McGrady achieves this effect using a plastic sandwich bag, with a hole torn in the side. He places the ring of plastic around his camera lens, secured in place with a rubber band, leaving rough, torn, slightly crunched edges visible through the viewfinder (but not obscuring the image completely). The intention is that the middle of the image remains well-focused and sharp, while the edges become misty. You can experiment with using marker pens to colour the plastic or increasing the number of layers of plastic.
Use a hand-held glass lens or prism, to create blurred, abstract forms, like this photograph by Sam Hurd:
A convex lens or prism held in front of your camera lens can create stunning reflections, distortions and ‘bokeh’ (see below) within and around your image. The results are unexpected and unpredictable, often creating beautiful abstracted shapes and colours that are not easily replicable using Photoshop. A hand-held glass lens or prism enables you to quickly add variety to an image, bending and directing light and colour from the scene itself. Sam Hurd has used this technique to create a strong focal point: a magical environment with attention swiftly focused upon the two figures in the centre. This technique takes practise, but can generate some spectacular results.
Deliberately unfocus lights to create ‘bokeh’, as in this beautiful landscape by Takashi Kitajima:
Takashi Kitajima stands on high-rise buildings and photographs Tokyo city at night, capturing radiant semi-abstract urban landscapes. This composition contains a single focused area, surrounded by circular, glowing ‘bokeh’ – shimmering orbs that appear when a camera lens attempts to record unfocused points of light. Bokeh is created in different ways by different lenses – typically appearing unintentionally in the background of a scene. In this image, Kitajima has used a narrow depth of field (so the area in focus is very small). In addition to being an exciting part of outdoor night photography, bokeh can occur in dimly lit interiors, such as when photographing sequinned fabric, glitter sparkle or Christmas lights etc.
Photograph scenes through visible hand-held lenses, as in this A Level Photography work by Freya Dumasia:
Identity photography ideas: these photographs were created by distorting and inverting crowd scenes through circular lenses. The frame of the lens becomes a dominant compositional element, containing blurred and abstracted figures that are reduced to smears of unidentifiable colour.
Abstract an image completely through three mirrors, creating a vortograph, like Alvin Langdon Coburn:
A vortograph is the abstract kaleidoscopic photograph taken when shooting an object or scene through a triangular tunnel of three mirrors. Alvin Langdon Coburn’s images were some of the first abstract photographs taken.
Fold a photograph and make a installation, still life or sculpture, as in this example by Joseph Parra:
Joseph Parra has cut and folded three identical prints with meticulous precision, creating transfixing, distorted portraits. Entitled ‘Oneself’, this work references the ‘fractured, multiple, and twisted ways we often view ourselves’. Many students search endlessly for still life photography ideas: this is a reminder that sometimes the photograph itself can become the still life.
Create 3D photography collages, as in these works by Midori Harima:
Midori Harima makes black and white Xerox copies of photographs on archival paper and uses these to create hollow papier-mâché sculptures, with methyl cellulose paste, archival tape and paperclay (clay that has paper fibres added to it, resulting in a stronger, light-weight modelling product that can make thinner more delicate forms and easily bonds with other mediums when dry). The final works are formed from tiny pieces of the images, exploring ideas about childhood senses and our fragmented absorption of data in an ‘information intensive society’.
This series of contemporary photographs, entitled ‘You were there we were all there’, have precise, analytical strips of coloured paper collaged onto black and white photographs, removing the human presence from an image. Her work explores popular culture and the ‘conditions of living in a commercial system’.
Splash, smear or throw mixed media upon photographs, as in this A Level Photography sketchbook example by Jemma Kelly:
This is a richly textural high school Photography sketchbook, completed for an AS Photography project. It explores the theme: ‘Unknown and Forbidden’. Collaged, mixed media photography techniques can add another dimension to photographs, and can help with the exploration of conceptual photography ideas.
Photographer Sally Mann is a fan of antique photography technology, often using a bellows camera (one that has a pleated, expandable box to extend the lens). She has produced a significant body of work using the platinum printing process, which results in high quality monochrome images with a very wide tonal range, as well as the bromoil printing process, which involves making an oil print from a bleached and hardened print on silver bromide paper. Bleaching makes the darkest areas of the print become hardest, so when soaked in water, more water is absorbed in the highlights. Due to oil and water not mixing, when the bromide image is inked with oil paint, the oil adheres to the darker areas only. This can then be printed using a printing press, resulting in a soft paint-like image, with no two images exactly the same. Sally Mann has also created many works using the collodion wet plate process, which can result in images that appear to be a hybrid of photography and painting. This is a laborious historical printmaking method in which the final image is created onsite using a portable darkroom. It has seen a revival in popularity amongst contemporary photographers, with photography equipment now available to simulate this practise. As in the examples above, colours are not true-to-life. It should be noted that these techniques involve complex processes and chemical mixing and are thus not suitable for most beginner Photography students (unless guided by a particularly enthusiastic teacher). The stunning images above, however, suggest many creative ways in which paint, ink and photography can be combined as part of a high school Photography project.
Paint developer sporadically onto photo paper to expose only parts of the work, as in these portraits by Timothy Pakron:
Visual artist Timothy Pakron uses experimental darkroom techniques to create ‘silver drip portraits’ of his close friends and family, including his mother and twin sister. Rather than immersing the paper entirely, Pakron hand-paints developer solution onto the photo paper, revealing key elements of the face, such as eyes, nose and mouth, communicating emotion via a few selected features. The dripping chemical solution creates a stream of drips across the image, revealing further details of the face in unexpected and unpredictable ways. The drips suggest tears, exhaustion and despair: the feeling of being submerged in a storm. This aptly communicates the struggle of separation and loss in his family, which are specifically represented in the portraits of his twin sister and mother.
Paint directly onto photographs, as in these works by Gerhard Richter:
Gerhard Richter has painted over 500 of his own photographs (with many more works discarded): commercially printed images that are overpainted with spontaneous gestural smears, using leftover oil paint applied with palette knives, squeegees or doctors’ blades. In the examples above, the thick painted lines divide the composition and inject colour into what is otherwise a rather drab interior scene. The paint disturbs the viewer – shatters the illusion that we are quietly observing a scene – pulling our attention to the tactile surface and smear of texture in front of our eyes.
Combine paint and photographs digitally, like Fabienne Rivory‘s LaBokoff project:
This project by Fabienne Rivory explores interactions between imagination and reality. Selecting photographs that represent a memory, Fabienne digitally overlays a gouache or ink painting, introducing an intense vibrant colour to the work. Students might like to experiment with this idea by creating a photocopy of a work and applying ink or watercolours directly (watery mediums will not ‘adhere’ to an ordinary photography surface).
Redraw part of a scene with paint, as in these works by Aliza Razell:
Although similar to the above technique, this involves more than applying painterly colours or textures to a work. In the example on the left, part of a digital image has been erased and replaced with a hand painted image. Many high school photography students have superb painting and drawing skill. Adopting a technique such as this can be a great way to flaunt multiple strengths.
Write on objects and photograph them, as in this A Level assignment by Hallam Girardet of Monmouth Comprehensive School:
This A Level Photography project explores identity: how significant events shape who we become. It draws inspiration from Mark Quinn and Sophie Calle. Text in a variety of fonts runs across the figure and is combined with dramatic lighting to create a moving final piece. As in this example, it is important that students integrate text with care, avoiding creating an obvious or literal work.
Paint onto objects and then photograph them, as in this IGCSE Photography piece by Rachel Ecclestone:
This IGCSE Photography portrait submission incorporates imaginative face painting with dramatic lighting and well-composed images. This approach is growing in popularity amongst contemporary online photographers and provides students with another avenue for expressing a wide range of artistic skill.
Mark or scratch negatives or photos, as in this 100 year old vintage print by Frank Eugene:
This image was created using photogravure – a photographic printmaking technique that was used to create some of the first photographs. It uses a treated, light-sensitive gelatin tissue that is exposed to the image and adhered to a copper plate. After the areas of unexposed gelatine are washed away (leaving different depths of hardened gelatine in darker and lighter areas) ferric chloride is used to etch the image into the copper plate beneath (the ferric chloride soaks in more in the shadowed / darker areas etc), allowing a fully tonal photograph to be produced when printed using a printing press. In this example, Frank Eugene has scratched away background details with a retouching knife, so the horse remains the dominant element in the composition. The resulting image is a combination of drawing, etching and photography (an unorthodox approach for the time, which was influenced by his experience as a painter). Photogravure is now a largely discontinued method of printing a photograph (it has been replaced by laser etching machines – see below) however, it inspires a range of contemporary photography ideas, such as scratching the surface of a photograph with a fine point or scratching a negative prior to printing.
Use a CNC or Laser Engraving Machine to etch a photographic image onto glass, wood, aluminium or another similar material:
As technology progresses, it is possible for digital images to be engraved upon various surfaces (such as stone, timber, fabric or leather); on or within glass, as in a 3D crystal engraving; or around cylindrical items, such as a rotating bottle. A laser is used like a pencil, with a controlled beam moving in different directions, intensities and speeds, delivering energy to the surface, heating up and vaporises areas or causing small pieces to fracture and flake away. Although the majority of laser photo engraving examples online seem to be uninspiring commercial shots, laser engraving offers new possibilities for high school Photography students – not just in terms of printing images onto exciting materials, but as a way of creating a textured plate which can then be printed from. It should be noted that although most high school Art Departments are not in a position to purchase a 3D laser engraving machine to experiment with (although this may change in the future) some Design and Technology Departments are beginning to. Many companies also offer a custom laser engraving service that students may make use of. Remember that those who must post work away for assessment are not able to submit heavy, bulky or fragile pieces (such as laser wood engraving or laser engraving on glass).
This photograph blurs the boundary between a 2D representation and reality, integrating photography with 3D elements. Some of the works by Carmen Freudenthal and Elle Verhagen include videos projected onto photos and images printed onto draped sheets.
Scanography is the art of recording a subject using a flatbed scanner. It is created in the same way that Xerox art is created using a photocopier, however scanners typically have the ability to create larger, higher quality digital files, as opposed to an immediate black and white print. Scanography artists arrange objects upon the scanner screen (sometimes covering these with a layer of paper or draped fabric) and create a ‘scanogram’; or capture movement in exciting ways, such as Evilsabeth Schmitz-Garcia’s ‘Borderline Personality Disorder’ portraits above, which have been distorted and stretched as the scanner arm moves across the screen. Scanners can also be used to take scans of objects place upon existing photographs, as per the example below.
Place objects on top of a photograph and scan it, like this example by Rosanna Jones:
This image was created in response to the topic ‘Concealment’. A strip of folded tape was placed upon a blurred photograph and then scanned to create a subsequent digital image. This creates the illusion of a piece of tape floating in midair, in front of a ghost-like figure.
Put objects on top of photographs and rephotograph them, like these images by Arnaud Jarsaillon and Remy Poncet of Brest Brest:
Retaking photographs of photographs – similar to the scanning of photographs above – is another technique that is becoming more popular. Retaking photographs is particularly suitable when the nature of the added objects cannot be scanned (as in a wet liquid) or when you wish to use alternative angles and other photography techniques to manipulate the image further. In these examples by Brest Brest, the raw egg and tomato ketchup provide an unexpected contrast to the formal portraits, creating images that command attention.
Project images onto textured surfaces and rephotograph them, as in these experimental images by Pete Ashton:
These urban landscape photographs were created using a homemade camera that projects an image onto a piece of scratched plastic and then photographs this. A similar effect could be achieved by projecting images via an overhead projector or slide projector onto a textured or decorative surface, such as an eroding wall, ripped wallpaper and stained concrete.
Project images onto people or scenes, as in these examples by freelance photographer Lee Kirby:
Although images can be combined digitally, projecting one image across a three-dimensional form creates a close interaction between the two scenes. The projected image distorts and becomes obscured as it bends around a 3D form and falls within shadowed crevices. Projecting images onto people can be a great way to experiment with ideas relating to identity and portraiture, or as mechanism for moving towards abstract photography. It can also become a creative photography lighting technique – a way of introducing mottled, coloured light to a scene.
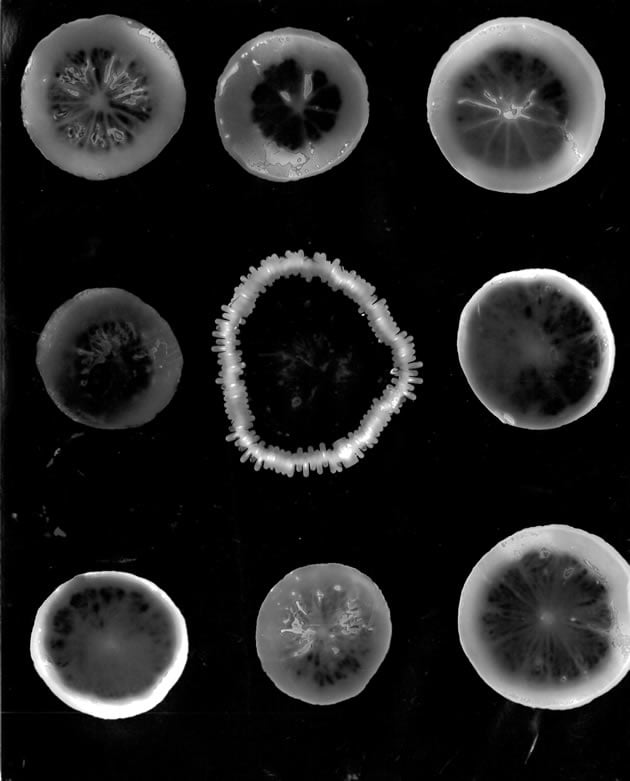
Create a photogram, as in this example by Joanne Keen:
Photography students often begin the year experimenting with the simplest type of photographic image – a photogram, also known as a ‘cameraless photograph’. This is created by placing objects directly onto photo paper in a darkroom and then exposing the arrangement to light for a set period of time. The objects create shadows on the paper in various intensities, depending upon the strength and duration of the light as well as the transparency of the items. Translucent items can be particularly successful, as in the slices of lemons and limes shown in Joanne Keen’s photogram above. Once the paper has been exposed to light, it is processed in the darkroom as per normal.
This awesome experimental photograph was created by Matt Bigwood during a six month exposure, using a homemade pinhole camera, made out of an aluminium can (the light proof box). The top of the can was removed and a pinhole was punctured in the side (the smaller the hole, the sharper the image – although the longer exposure time is needed, as less light is let in). Photographic paper was then inserted into the can (in the dark), with a cardboard lid placed back over the opening, before it was positioned in place. As the pinhole was uncovered, light entered the ‘camera’, creating an inverted view of the scene on the photographic paper (film can also be used) positioned inside the camera. Although pinhole cameras often create unpredictable photographs, they are a great way for understanding how photographs were originally created. This example by Matt Bigwood captures the movement of the sun (a type of photography known as solargraphy) across a suburban sky.
Note: some teachers purchase a make-at-home pinhole camera set for their students, such as this one from Amazon US or Amazon UK (affiliate links). Matt Bigwood‘s DIY pinhole cameras are made from ordinary aluminium drink cans:
Deliberately overexpose a shot, creating ‘high-key’ photography, like this portrait by Gabi Lukacs:
High-key photography is the result of letting too much light into the camera (having the shutter open for longer than the light conditions would normally require). Although overexposure usually occurs by accident, this can be used as a deliberate stylistic technique. A high-key photograph is typically taken in a bright location (extreme sunshine or under special photography lighting) with a white background or surroundings. A high-key photo often has a minimal, sleek and/or futuristic appearance: smooth flawless surfaces, pale shadows, few minor details, and light areas ‘blown out’ (whitened).
Experiment with underwater photography like Elena Kalis:
Students who are looking for creative portrait photography ideas will be inspired by the compositions of Elena Kalis. The dreamlike, other-worldly quality of shooting underwater can trigger many abstract or literally ‘cool’ photography ideas.
Many students assume that tweaking of the colour or light in a photograph takes place digitally, after the image is taken. Although digital editing tools are great, there are many benefits to starting with a higher quality image. Camera lens filters – optical filters which typically screw or clip to the camera lens – can help with this. The lens filter shown (above left) is a neutral density filter, which reduces the amount of light that enters the camera. This allows long exposure shots in brightly lit scenes, such as in Salim Al-Harthy’s beautiful seascape photography, to occur without becoming over exposed. Other filters affect the brightness or hue of a colour, reduce reflections, distort or diffuse a scene. Camera filters can be added and used in combination as needed.
Use specialised photography lighting to achieve dramatic contrasts, as in this portrait of two brothers by dankos-unlmtd:
Many high school photography classes have a set of lighting equipment, tripods and backdrops which can be shared among students and used for demonstration purposes. Although expensive lighting is not necessary to create a great shot (indeed, daylight is all that is needed in many cases), experimenting with photography lighting techniques can be helpful, especially in staged, indoor shots. Lighting is particularly important in black and white photography, where the removal of colour means greater emphasis upon light and shadow. In this portrait, backlighting creates a dramatic highlight around the contour of the face, emphasising the similarities and differences between the older and younger brother.
Use a transportable photography reflector (i.e. this one from Amazon.com or Amazom UK – affiliate links) to create better lighting within your shots, such as in this outdoor portrait by Toni Lynn:
Most transportable reflectors for photography are inexpensive, lightweight and easy to carry. They come in a range of sizes and colours and are usually made from reflective fabric, held taut by a wire ring (although you can make your own silver version using tinfoil taped onto a cardboard sheet or use reflective insulation board from a hardware store). The primary function of a photography reflector is to lighten a subject naturally, eliminate harsh shadows and/or add a sparkle to the eyes by directing, absorbing or diffusing light. Different coloured reflectors can also be used to change the mood of an image, such as a gold reflector for warmth and silver for increasing highlights. Black and translucent ‘reflectors’ are not technically reflectors at all – and instead absorb, scatter or diffuse light. In the example above, Toni Li demonstrates how a natural backlit portrait can be improved dramatically by reflecting light back onto the subject’s face.
Take unfocused shots and create semi-abstract photographs, like those by Bill Armstrong:
Bill Armstrong sets his camera’s focus ring at infinity and takes purposefully unfocused photographs. He makes collages – photocopying, cutting and painting over images – and then retakes these as blurred photographs, so that the resulting scene appears to be a photograph of reality. Exact identities and objects remain mysterious. This photographic technique allows the emphasis to be placed upon light, tone and colour, resulting in intriguing, suggestive images.
Create 360 degree 3D panoramic photography, as in this image by Nemo Nikt:
As technology progresses, more cameras and digital image manipulation programs offer the ability to combine multiple shots from different angles into spherical 360 degree photographs (usually with the appearance of little planets or floating worlds). Some cameras use two different lenses to achieve the 3D photography effect, while others use one. Students should be especially careful when using techniques such as this, as the temptation to experiment can overwhelm good judgment, but for certain themes or compositional approaches, 3D panoramic photography may be appropriate, especially if this is used in an artistic, experimental way.
Use kites to create aerial photography, as in this image by Pierre Lesage:
Kite aerial photography (KAP) is a technique for only the particularly dedicated and experimental Photography student. It involves lifting a camera via a kite using a purpose-built or DIY rig, with the shutter triggered remotely or automatically. Although one of the more complex (and potentially risky) photography techniques listed here, it can allow exciting experimentation with camera angles and height, creating beautiful images like the one by Pierre Lesage above, which would never otherwise be able to be achieved. With fast shutter speeds, motion blur can often be avoided. Students who are inexperienced using kite aerial photography are best to trial this using an inexpensive camera!
Produce High Dynamic Range Imaging (HDR Photography), as in this example by Karim Nafatni:
In certain situations, part of a normal photograph may appear too dark or too light. For example, when photographing a figure before a brightly lit window, the portrait and interior may appear as a dark silhouette – or the window scene may appear bright white. What is HDR photography? HDR is a way of solving this, by combining two or three photographs of the same scene taken at different exposures, so that all areas of the photograph have the right ‘dynamic range’ or brightness. As is demonstrated in this stunning photograph of an aeroplane flight deck by airline captain Karim Nafatni, even shadows and very bright areas in HDR photography are perfectly exposed and full of detail. This results in a captivating, almost illustrative effect. Wondering how to do HDR photography? Shots taken at different exposures can be combined using HDR photography software; the HDR mode in-camera or the HDR Camera setting on some smartphones (see the list below). In-camera modes do all the work for you and simply spit out the final image. HDR Photography tips: avoid movement (of both the subject and your camera) for the duration of the shots (use a tripod!); avoid this technique if you desire strong contrasts between dark and light areas; and do not use when a scene that is already vivid and well exposed.
SmartPhones with HDR Camera include (affiliate links):
Use tilt-shift photography to make real things look miniature, as in this example by Nicolas:
Tilt-shift photography is a technique that makes real objects appear small, as if they were part of a miniature scale model. This is achieved through blurring and distortion – either with special camera lenses (such as the Nikon or Canon tilt shift lens); lens adaptors (such as the Hasselblad Tilt Shift adapter) which convert traditional lenses to tilt shift lenses; digital manipulation after the image is taken; or using a free smartphone app or Photoshop. There are also websites that convert images to tilt-shift photos, such as http://tiltshiftmaker.com. A quick tilt-shift photography tutorial: start with a high quality, well-lit, in-focus photograph; take the photo from above and to the side (as if looking down upon a scale model); choose a relatively simple scene; and make sure people are small (realistic people don’t appear in models). Remember that exciting techniques such as this are fun and tempting to use to excess: integrate only those which are beneficial and relevant to your high school Photography project.
Use a tilt-shift effect to make paintings or drawings appear real, as in these photographs of Vincent van Gogh artworks by Serena Malyon:
Third year Art student Serena Malyon achieved some draw-dropping results when applying the tilt-shift technique to famous van Gogh paintings using Photoshop. Flat, two-dimensional images took on the illusion of three-dimensional scenes, casting the viewer suddenly back in time. This tilt-shift approach may be more suitable for high school students who specialise in Painting, but there may be ways in which digital distortion of painted scenes can form an integral part of a senior Photography project.
Photograph things with extreme macro lenses, like these photos of water drops by Andrew Osokin:
These ethereal photographs of frozen water drops on plants are at such an extreme scale that they seem to be of a miniature, undiscovered worlds. Students looking for macro photography ideas often do not have to look far. At an extreme close-up, a whole other realm of detail and possibility emerges.
Photograph things without contextual information, so objects become almost unrecognisable, as in this example by Peter Lik:
The subject matter of this dramatic photograph is not immediately clear. At a first glance, it could be a swirling sheet in air, sand dunes at sunset or thick layers of impasto paint smeared across a canvas. In fact, Peter Lik is a renowned landscape photographer and this work is from his Hidden Canyon’s series – photographs of America’s beautiful canyon landscapes. Rather than seeking to distort or manipulate a scene, students looking for abstract photography ideas may wish to take this approach: zoom in until all contextual information is missing from a shot, capturing a beautiful fragment of the world that no one else has seen.
Take photos from uncommon or unexpected viewpoints, like these birds eye view photographs commissioned by the human rights organization Society for Community Organization:
Photographing something from an uncommon angle can often result in fresh, unexpected images. This bird’s eye view shows a tiny apartment in Hong Kong, where 1.3 million people live below the poverty line. The image was taken via a camera installed in the ceiling and aims to illustrate the unsafe living conditions of people crammed into small spaces.
Use frames within frames to create intriguing compositions, such as these photographs by Chen Po-I:
‘Frames within frames’ is an age-old compositional strategy that helps to direct vision, create depth and emphasise certain areas of a photograph. In these examples, from Chen Po-I’s series ‘Outlook’, urban growth in Taiwan is framed by windows in nearby derelict, abandoned buildings. This helps to contextualise the scenes and introduces ideas related to industrial expansion.
Photograph forms inside other forms, like Per Johansen:
Per Johansen has taken captivating photographs of organic meat and vegetable squeezed inside clear plastic containers. These examples show a sausage and eel coiled within mass produced synthetic bottles. Many students search aimlessly for creative still life ideas: the notion of arranging objects inside other objects may have potential for a wide range of different themes.
Emphasise reflections, rather than the objects themselves, as in the urban landscape photography of Yafiq Yusman:
There are many opportunities for students to explore reflections within their work – such as those that occur upon metal, glass or water. Yafiq Yusman has created a great series of bustling Singaporean landscapes photographs showing scenes from his home town reflected in puddles.
Another creative approach is to place emphasis upon the shadows created by a subject. This can lend itself to trick photography ideas or illusions, as in the example above, or provide a way for creating dramatic lighting conditions within a photographic work.
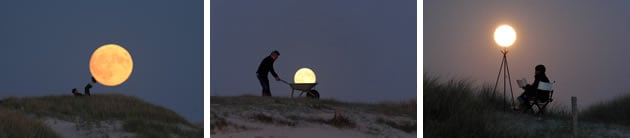
Create illusions using forced perspective, like these photographs by Laurent Laveder:
Forced perspective is an optical illusion that occurs when deliberately tricking the viewer into thinking that an object is larger or smaller than it actually is. The illusion is created through careful staging of viewpoints and camera angles. Most forced perspective photographs involve cliche scenes that are best avoided within a high school Photography project, but there are some beautiful examples, such as these evocative works by Laurent Laveder.
Arrange compositions as if they were a beautiful still life painting, such as these food photographs styled by Maggie Ruggiero and photographed by Martyn Thompson (left) and Marcus Nilsson (right):
Every shape, texture, colour and form within these photographs has been considered, selected and positioned with care. Those looking for out-of-the-box indoor photography approaches or unusual still life photography ideas can find it helpful to remind themselves that Photography students have the same level of compositional control as do Painting / Fine Art students. Understanding how to balance and link different elements of a composition might be all that is needed for you to create unforgettable still life photography.
Create candid documentary photography, like these emotion-filled black and white football fan shots by Christopher Klettermayer:
Documentary photography – or reportage photography, as it is sometimes known – involves candid photographs of unstaged, unmanipulated scenes (usually involving people) such as might be taken by a photo journalist. Emphasis is often upon movement, expressions and emotions of the subjects, with images left in a mainly raw, unprocessed state. Looking around for opportunities in your local environment can be all that is needed for students to find documentary photography project ideas, however it is worth remembering that capturing well-balanced innovative compositions in an unfolding situation takes practise and skill.
Create a composition that tells a narrative or story, like Dan Winters’ photography featuring Brad Pitt:
Narrative photography involves communicating a story through visual clues: a frozen moment in time. Students looking for narrative photography ideas can learn a lot from looking at Dan Winters’ photography. In the celebrity portrait above, props, backgrounds, the dimmed lighting and Brad Pitt’s pose all work together to suggest a particular backstory. Unlike documentary photography, where the photographer carefully selects an angle and cropping of the scene that already exists, narrative photography involves precise staging and careful manipulation of the ‘characters’ within the story.
Capture the same scene at different times, as in this photography series by Clarisse d’Arcimoles:
Clarisse d’Arcimoles has taken a series of photographs mimicking old family photographs, creating identical compositions of family members at different stages in their lives. The series explores ideas such as the ‘irretrievability of the past and photography’s strength to make memories tangible’. Facial expressions, body angles, clothes, hairstyles, props and background settings are recreated entirely, so that family members sense that they travel back in time while the shoot takes place. Once taken, the shot is manipulated digitally, adding grainy textures and changing the light and tone to mimic the contrast within the old photograph. This image is an archival injet print of d’Arcimole’s sister, aged 13 and 35.
Photograph things that are submerged in coloured liquid or milk bath, such as these shots by Rosanna Jones:
These images by Art student Rosanna Jones show a figure lying in a lukewarm bath of powdered milk. This results in beautiful, semi-translucent, ghostly images, with dramatic focal areas and a high-key effect (see above).
Use mirrors to create illusions, as in this self-portrait by 18 year old photographer Laura Williams:
Mirrors hold much potential for students and can be useful for directing light as well as reflecting images. This photograph was digitally enhanced using Photoshop, so that the mirror appears transparent or invisible, showing the landscape behind the figure.
Create a complex ‘unrealistic’ setting and photograph it, as in this composition by Cerise Doucède:
When so many photographers insist upon using digital manipulation to create bizarre and unexpected scenes, it is refreshing to see Cerise Douède string inanimate objects from the ceiling, positioning these as if they are exploding outwards from a central figure. Creating this extraordinary still life took Doucède three days. The strings are left visible in the final photograph, adding an element of awe to the work, as the viewer becomes aware that this is not digital fantasy.
Collect many similar items and produce typology photography, like Sam Oster’s apparatus series:
These silver gelatine prints consist of electrical consumer goods arranged in a grid format. Each item is photographed formally, within an identical setting: a typology of kettles and electrical fans. This is part of Samantha Oster’s ‘Short Circuit’ series; a photo-media investigation of the electrical consumption of modern society. The items were collected from dumps and rubbish collections and photographed using black and white film, before being processed by hand.
Organise subject matter into patterns, like Jim Golden:
Photography students sometimes get caught up in ‘finding’ a perfect scene, environment or moment to photograph and forget that they have direct compositional control. Objects or scenes can be deliberately arranged and composed, creating meaningful installations or repeating patterns. A reminder of the price of progress, Jim Golden purchases obsolete technology at yard sales and thrift stores and arranged these into dramatic patterns. Placing hundreds of near identical objects next to each other forces viewers to notice and observe tiny differences.
Digitally create patterns, as in this artwork by Misha Gordin:
Whereas the above example depicts a physical arrangement of subject matter, this photograph shows how digital manipulation can be used to create a powerful and moving image.
Overlay multiple photos from slightly different angles, like these experimental photographs by Stephanie Jung:
Stephanie Jung creates stunning urban landscapes, overlaying near-identical city scenes that have been taken from slightly different angles, at different transparencies and colour intensities. The repeated forms (buildings / vehicles / street signs) suggest echoed memories, vibrations of life; the ebb and flow of time.
Digitally erase parts of objects, as in this A Level Photography work by Leigh Drinkwater:
The mouth of this A Level Photography portrait has been digitally removed using photography editing software. Rather than erasing the image entirely, a ‘rubber stamp tool’ or the equivalent can be used to duplicate a surface. In this case, facial skin has been imitated, concealing the mouth.
Colour select areas, as in this example by Locopelli:
This photograph uses colour to draw attention to a certain area of the composition and create a focal point. Photography editing software is used to create a duplicate black and white copy of an artwork as a separate layer beneath the original photograph. The coloured layer is then partially erased, cropped or selected, leaving colour visible in certain areas only.
Apply a digital filter to create an illustrative effect, as shown in this Adobe Photoshop tutorial:
Many Art teachers and examiners have a fervent dislike of Adobe Photoshop filters. This is because many students seem to believe that spending ten seconds applying a garish filter to a mediocre photograph transforms it into ‘art’. Digital filters do have a place, however, and can provide enormous value (such as in the example above, when several Photoshop filters have been applied, manipulated, erased and tweaked before arriving at the final image). Using digital filters may be particularly appropriate for students who incorporate photography within graphic design or illustrative projects.
Digitally overlay textures onto photos, as illustrated in this tutorial by PhotoshopStar:
Textured layers can be digitally added to part or all of a photograph to impart the illusion of texture. There is a huge range of possible textures that are suitable for photographic overlays; the opportunities are endless. Students should find and photograph these themselves – for example, decaying timber surfaces, peeling paint or stained concrete. Ideally a student’s theme or topic should inspire a suitable textural surface to explore.
Digitally combine paintings with photos, as in these examples by Dennis Sibeijn and Iwona Drozda-Sibeijn of Damnengine:
Damnengine uses photography editing software to combine stunning painted textures with photographic images, creating an exciting graphic illustration. The repetitive element in this portrait and the surrounding paint splatters helps to express movement and energy. This technique suggests numerous ideas for portrait photography, as well as a development path for students who wish to move towards abstract photography ideas.
Digitally draw over photographs, as in these portraits by May Xiong:
These haunting photographs show painted figures overlaid with a web of linear structures. The images explore the human mind; the interconnected maze of human thought.
Repeat or stretch pixels, as in these examples by Maykel Lima:
In these digitally manipulated works by Maykel Lima, lines of pixels have been stretched to the edge of the image – a promising approach for those who wish to create abstract or partially abstract photographs. This is a relatively simple process using image manipulation software, yet it requires careful selecting and balancing of space, form, line and colour.
Digitally superimpose photographs onto other products, as in these watches by John Rankin Waddell:
Contemporary photographer Rankin has helped design the new Swatch watches, which are adorned with his close up photographs of human eyes. In this example, eyes become unusual, captivating patterns that adorn a product.
Digitally merge images to play with scale, as in this photograph by Katherine Mitchell:
Merging images using photography editing software such as Adobe Fireworks or Photoshop and exploring surreal photography ideas can result in exciting and striking images. This beautiful photograph by Katherine Mitchell depicts people in boxes.
Lorna Freytag is a photographer, children’s book illustrator and author. She creates commissioned portraits, like the works above, merging children into imaginative, fantasy situations. Students often want creative portrait photography ideas and to integrate stories and fairytales within their work; these examples combine both.
Students often become adept at using digital software to erase or enhance parts of scenes, forgetting that objects themselves can be used to construct entirely new scenes. In this case, a landscape has been physically crafted from food, with vegetables superglued and pinned in position upon a tabletop in Carl Warner’s studio: celery stem trees; mushrooms for rocks etc. A series of different photographs are taken of the miniature landscape, using a combination of tungsten and flash lighting equipment to simulate daylight. These images are then assembled digitally, post production.
Make sculptural installations and then photograph them, as in this A Level work by Kim Seymour:
This A Level Photography work explores themes about the of exploitation of women, using a sculptural installation. Lights behind greaseproof paper windows draw attention to certain parts of the photograph. Moving beyond an ordinary photography still life, the sculpture becomes a conceptual art form in its own right.
Photograph things pressed against transparent surfaces, as in these photograph details by Jenny Saville:
These Jenny Saville photographs show a woman’s body pressed up against glass. Well known for her shocking contemporary paintings, Jenny Saville’s photography is just as captivating – a superb example of creative portrait photography ideas.
Photograph things through transparent sheets, as in these works by Flóra Borsi:
Flóra Borsi combines photographic elements with painting techniques in these creative portraits. The images depict a model holding a painted transparent sheet, so that the painterly marks semi-obscure her body. This could be a great approach for students investigating identity, for example.
Photograph objects through mottled or translucent screens, like this work by Matthew Tischler:
Matthew Tischler takes photographs through window screens, netting and scrims, using these to dissect, pixelate and filter his images. This removes the fine detail from his work and creates ‘faceless characters whose identities are defined by their surroundings’.
Overlay tracing paper, obscuring parts of an image, like this photograph by Gemma Schiebe:
This work by Fine Art student Gemma Schiebe emphasises our loneliness within cities and explores the idea that people often move around a busy urban space without any connection or interaction with those around them. The central figure has been cut out of the tracing paper, so that the surrounding scene is washed out and obscured.
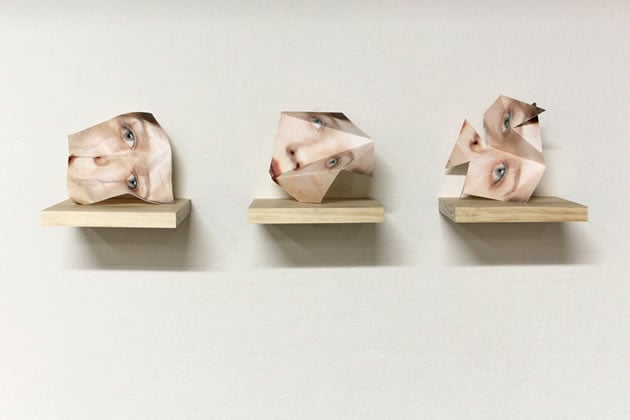
Cut, fold and manipulate photos, like these examples by Joseph Parra:
In Joseph Parra’s ‘Braided’ series, portraits are sliced into strips and plaited, obscuring the faces. Manipulating the paper that photography is printed upon holds exciting potential for students.
Aiming to replicate the effect of peeled layers of skin, the Stratum series was created by distressing and ripping Xerox copies of portraits (photocopies fold and tear more easily than photo paper) layering and overlapping these, before rephotographing. The resulting images were digitally manipulated further, to produce a three dimensional effect.
Cut through photographs to expose other layers of photographs below, as in these images by Lucas Simões:
These images are created by layering a similar photograph on top of another and then cutting precise holes into the top layer to expose the images below. This is repeated many times, creating a semi-abstract final work that is composed of fragmented and disassembled forms. The forms can be neatly cut using a craft knife or – as in the case of Lucas Simões’ latest work – a laser cutter.
Note: If you are interested in laser cut work, you may wish to see the excellent A Level Art project by Lucy Feng, which has been featured on the Student Art Guide.
Create layered handmade collages, like these works by Damien Blottière:
After taking initial photographs, Damien Blottière cuts, layers and pastes these, extending the lines and curved organic forms of the human body – the bones, muscles, face, features and limbs – as well as the designer garments that clothe them, creating fantasy/futuristic images. The cuts become the act of drawing, with shadows between the layers adding depth.
Cut out shapes and insert coloured paper, as in these photographs by Micah Danges:
These landscape photographs by contemporary photographer Micah Danges have separate photographic layers and incorporate stylised abstract elements. The simple strategy of cutting pieces out of a photograph and adding layers of different paper can be a great technique for high school photography students.
Collage photographs and found materials together, creating mixed media art like Jelle Martens:
These precise, analytical works by Jelle Martens, combine geometric blocks of colour with photographs, creating perfectly balanced patterns
Make a photomontage, as in these examples by David Hockney:
This photography collage of a chair by David Hockney shows how several viewpoints can be combined within the one photomontage, creating an image that is intriguing and cohesive, despite the distorted perspective. This approach might be suitable for those looking for still life photography ideas or those who wish to move towards a more fragmented or abstracted photographic image.
Make a photographic assemblage combining foreground, middleground and background, as in this example by Matthew Chase-Daniel:
Matthew Chase-Daniel explores the way we look at the world. Rather than taking a single snapshot, he collects a ‘group of moments’, simulating the way we look in different directions and focus upon essential details. He takes a collection of photographs over a few hours or days, sometimes moving around the landscape; other times remaining still. Once he returns to his studio he selects, edits and arranges the photographs digitally, so they communicate the essence of a place. The final composite work is printed at a large scale on rag paper.
Make an photography collage using masking tape, like Iosif Kiraly:
Whereas the previous photomontage montages involve precise trimming and arrangement of forms, this collage has an informal aesthetic, with visible pieces of masking tape holding it together. This can be a great method for shifting and moving pieces until the work is well balanced and cohesive. Iosif Kiraly’s work explores the relationship between perception, time and memory.
Photograph a single scene over time and join the pieces in sequence, like these composite photographs by Fong Qi Wei:
These photographs are from Fong Qi Wei’s ‘Time is a Dimension’ series, and show digital slices of photographs taken over several hours at one location. The shots above show a seaside in sunrise, with the images organised together in a way that shows the changing light conditions.
Cut and Overlap a sequence of photos to create a sense of movement, as in this A Level Photography project by Harriet James-Weed:
Many students who explore motion photography ideas leap towards flashy digital manipulation tricks, without first making use of hand-generated collage techniques. This photomontage has been manually assembled upon a wooden surface, with images overlapped in sequence to imply movement. It was inspired by the great photography series of Edward Muybridge and is an excellent way of investigating conceptual ideas for subsequent works.
Create sequence photography by combine multiple exposures, as in the high speed photography of Ray Demski:
Quick release shutter speeds allow photographers to create an exciting sequence of photographs. Ray Demsky captures athletes in motion: digitally combining a series of high speed photographs in a single composite work.
Combine multiple exposures to create the illusion of repeated objects, like these creative compositions by Lera:
Combining multiple exposures within one photograph (the same technique that is used for sequence photography above) makes it possible to create the illusion that there are many identical elements within a composition. In these great examples, a imaginative fantasy concept is created – several mystical figures moving dramatically within the frame.
Superimpose two different but related scenes over the top of each other, like in this photograph by Adam Goldberg:
Traditional photographers have long been able to create two exposures on a single piece of film. This technique is now also easily achieved digitally – overlaying images using a multiply or transparency filter, for example. This example shows how the integration of two different scenes can help to strengthen the ideas communicated within an artwork.
Many high school Photography students have skills in a wide range of other art disciplines. If you are looking for photography portrait ideas or still life photography ideas and are also a strong painter or drawer, you may wish to use trick photography to create surreal, distorted or unexpected illusions. Greg Scott takes photographs of large painted self-portraits, suspended within a real life setting. The final shots are black and white photographs (the elimination of colour helps to conceal the boundary between the painted and ‘real’ worlds) with careful organisation of perspective helping to merge the boundary between the painted and photographic image.
Add photography cuttings to real life situations, like the surrealist scenes created by Yorch Miranda:
This image has been created by hanging a cut out photographic figure above a laundry basket. The change in scale results in an inventive, surrealist scene, with the shadow cast by the figure becoming an integral part of the work.
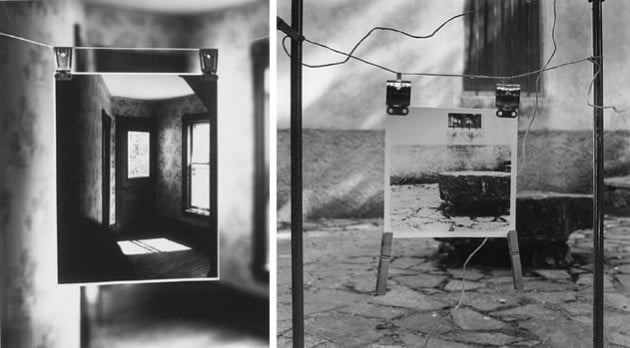
Inset scenes within other scenes, as in these photographs by Richard Koenig:
Richard Koenig hangs a print and rephotographs this in its new location, creating intriguing illusions of space within space. Perspective lines within the two images are aligned to create optical confusion, so the viewer is disconcerted and unsure about the separation of the two spaces. His work often features intimate, private moments inset within generic, impersonal, public environment.
Poke or cut holes in photos and shine light through, like Amy Friend:
Using an unconventional photography lighting technique, Amy Friend pokes holes in photographs, so that pinpoints of light cast a magical glow over portraits that have faded and darkened with age. Although many students looking for vintage photography ideas resort to copying this approach exactly, there are many other possibilities, such as cutting and folding images in different ways, shining different coloured lights through gaps, rephotographing images at unusual angles and scales, distorting images and deliberately creating bokeh.
Photograph scenes through small gaps or holes, as in these photographs by Reina Takahashi:
Photographing a scene through holes holds exciting promise for students. In these examples, Reina Takahashi creates an intricate paper cut and then photographs a room interior behind this. This fragments and abstracts the image, and casts beautiful shadows.
Experiment with night photography and create a light painting or drawing, as in A Level Photography example by Georgia Shattky:
Use a fast shutter speed to freeze motion, like the action photography of Justin Grant:
A fast shutter speed gives us the option to capture action that might not normally be visible with the naked eye. Although many students fall for the trap of recording cliche high speed movement, such as splashing water, shattering wine glasses or racing cars, there are many ways in which high speed / action photography can be integrated within a high school Photography project. This shot by Justin Grant provides a great example. The emphasis is not just upon capturing the athletic movement of the human body, but upon composing a polished and well-balanced piece of art.
Move the camera horizontally, so a moving subject is in focus but the background is blurred, as in the panning photography of Mr Bones (via My Modern Met):
Panning is often one of the first ‘tricks’ that Photography students are introduced to. Using a slower shutter speed, the camera follows the motion of a moving object, ensuring that the panning movement is as smooth and steady as possible (sometimes this can be achieved by rotating the camera atop a tripod). This results in the background appearing blurred, with the moving object sharp, as in the example of a cat chasing a mouse above.
Use slow shutter speeds to create blurred movement, as in this beautiful water photo by Antti Viitala:
This amazing seascape by Antti Viitala shows overcast and stormy skies above crashing waves in South Africa. Long exposures blur the boundary between the sand and sea, creating an eerie and almost other-worldly effect.
Zoom in while shooting with a slow shutter speed, like A Level Photography student Freya Dumasia:
This image was created by zooming the lens in and out at a slow pace, in a relatively low-light setting, with a slow shutter speed (low-lit situations help to avoid over exposure). The model stood still and the camera was on a tripod (the aim is to minimise any movement aside from the zoom of the lens). This photography technique creates a sense of movement and creates a dramatic focal point. It usually takes practise and experimentation to achieve the desired effect. Those without a zoom function on their camera can attempt to manually move their camera towards or away from a scene, however this can makes things challenging, as it introduces movement and camera shake.
Experiment with slow shutter speeds at night, blurring lights, as in the abstract ‘Sightseeing Tunnel’ series by Jakob Wagner:
Photographer Jakob Wagner took a five minute tunnel ride in an automated car through a tunnel in China, creating vibrant, abstracted, long exposure, night photography that conveys the motion and changing light conditions along the journey.
Photograph slow moving objects over a long period of time, as in this photograph by Paul Schneggenburger:
Paul Schneggenburger photographs couples sleeping. Taken during a single six hour exposure, the images contain many overlapping forms, reflecting a ‘nocturnal lovers dance’ in candlelight. Students looking for night photography ideas often assume that their options are limited to bright moving lights: Schneggenburger’s work is an excellent reminder of the potential that exists in other low-light settings.
Swing the camera while taking photos to achieve a swirling effect, as in this photo by Lucasbenc:
Swinging of the camera while shooting can help to create a sense of movement in a photograph or create spontaneous, unpredictable blurred, generating unexpected abstract photography ideas.
After focusing upon a scene, deliberate shaking of a camera with small, controlled movements (making sure that the shake reduction feature is turned off on a DSLR camera) can result in painterly impressionistic scenes. It can help to start with slower movements, adjusting the aperture and exposure settings until the desired appearance is achieved.
Photograph moving subjects to create blurred, painterly forms, as in these examples by Mirjam Appelhof:
Whereas most photographers capture a frozen moment, Mirjam Appelhof aims to express the ongoing passage of time. Rather than create an ordinary static image, she photographs herself moving, using a self-timer. Sometimes she works over the images with paint or different materials.
Create abstract photography from blurred motion, as in the ‘Revolution’ series byYvette Meltzer:
Yvette Meltzer takes photographs in Chicago laundromats, closely cropping the images of driers in motion so that they become abstract pieces. Meltzer quotes Picasso: ‘There is no abstract art. You must always start with something. Afterward you can remove all traces of reality.’
Digitally add abstract elements to an image, such as these architectural photographs by Nick Frank:
Nick Frank creates sharp, stylised photographs of architectural details, zooming and framing a scene so that surface claddings appear to be vibrant two-dimensional paintings or designs, finding beauty and grace in spectacular and sometimes ‘ordinary’ architectural form.
Take close-up, tightly cropped scenes, creating abstract photography from surfaces and pattern, like these works by Frank Hallam Day:
Frank Hallam Day carefully selects pieces of hulls from wrecked ships in West African harbours. Peeling paint, eroding metal and horizontal water lines take on the linear and textural qualities of an abstract painting: a commentary about the influence of time upon humanity’s technical achievement.
Finally, forget all fancy techniques. Open your eyes. Produce an unflinching record of what you see, as in this example by Gianfranco Meloni:
There are moments when it is best to forget outrageous techniques, enticing accessories and photography trickery, and instead concentrate upon the world in front of you. Find the beauty that is overlooked and bring it to the forefront. Find the magic and hold it still for others to see.
This collection is a work in progress. It is continually updated with creative photography ideas and examples. If you are looking instead for photography theme ideas or project ideas for your entire high school or college photography course, please read our article about how to select a great subject or theme for your Art project.
You may also wish to view our collection of Featured Photography Projects by high school students from around the world.


. The final works are formed from tiny pieces of the images, exploring ideas about childhood senses and our fragmented absorption of data in an ‘information intensive society’.")